Due:
- Milestone 1 due Friday, Sept 25th by 11 pm
- Milestone 2 due Friday, Oct 2nd by 11 pm
- Milestone 3 due Friday, Oct 9th by 11 pm
Update 9/18: updated the Unit tests, helper functions section with a more complete set of possible helper functions, and updated the example register/memory comment to show a better example of defining variables in memory
This is a pair assignment, so you may work with one partner.
Assembly language programming is challenging! Make sure
you start each milestone as soon as possible, work steadily, and
ask questions early. Also, writing unit tests and using gdb to
examine the detailed behavior of code under test will be critical
to successful implementation of the assembly language functions.
Overview
In this assignment, you will implement transformations on image files, using both C (in Milestone 1) and x86-64 assembly language (in Milestones 2 and 3.)
Milestones
In Milestone 1, you are required to implement all of the image transformations in C. You are also required to implement comprehensive unit tests for all of the helper functions you use to implement the transformations. The intent is that your assembly language code in Milestones 2 and 3 will implement the same helper functions, and your unit tests will help you gain confidence in their correctness.
In Milestone 2, you are required to implement the
wrap and
blocky
transformations in assembly language. We expect you to have comprehensive unit tests
for the assembly language implementations of your helper functions. (In theory you can
just use the ones you implemented in Milestone 1.) Note that we will not officially
grade the quality and comprehensiveness of your unit tests until Milestone 3.
In Milestone 3, you will implement the
puzzle and
rainbow_h
transformations in assembly language.
Note that in each milestone, we expect all of the tests executed
by your unit test program to pass. For Milestone 2 in particular, you can
comment out calls to test functions that aren’t related to
helper functions needed for Milestone 2. For example, for Milestone 2 your imgproc_test.c’s
main function might have code similar to the following:
TEST( test_get_rgba );
TEST( test_make_pixel );
//TEST( test_compute_rainbow_rgb );
The tests for get_rgba and make_pixel
are enabled because they are all test functions involved
in the implementations of the transformations
required for MS2. The test for compute_rainbow_rgb
is commented out because it is used in the rainbow_h
transformation, which is not part of the requirements for MS2.
Non-functional requirements
In Milestones 2 and 3, you will be writing assembly language functions. You must write these “by hand”, and your assembly code must have very detailed code comments explaining the purpose of each assembly language instruction.
A good rule of thumb is that every assembly language instruction should have a comment describing what it is intended to do.
It is not allowed to generate assembly code using a C compiler and submit this as your own code. We will assign a grade of 0 to any submissions containing compiler-generated code where hand-written assembly language is expected.
Your submission for each milestone should include a README.txt file
describing how you and your partner divided the work, and letting
us know about any interesting implementation details. If there is
functionality you weren’t able to get working completely, this is
a good place to mention that.
We expect you to follow the style guidelines. However, the expectations for function length will be relaxed considerably for your assembly language code. It is not unusual for an assembly language function to have 100 or more lines of code. In the reference solution, the longest function was about 149 lines, although there was extensive use of comments and whitespace to improve readability.
Of course, you should strive to make your assembly language functions as simple and readable as possible.
We expect your code to be free of memory errors. You should use
valgrind to test your code to make sure there are no uses
of uninitialized variables, out of bounds memory reads or writes,
etc. This applies to both your C code and your assembly code.
If any test assertions fail when you run the unit test program, that may lead to a memory leak due to one or more test objects not being freed. This situation does not count as a memory leak in your code. (However, you should definitely fix the bug that is causing the test assertion to fail.)
Grading breakdown
Milestone 1: 30%
- Implementation of C image transformation functions: 12.5%
- Unit testing of helper functions: 12.5%
- Design/coding style of C functions: 5%
Milestone 2: 35%
- Functional correctness of
imgproc_wrapandimgproc_blocky: 30% - Design/coding style of assembly functions: 5%
Milestone 3: 35%
- Functional correctness of
imgproc_puzzle: 10% - Functional correctness of
imgproc_rainbow_h: 10% - Unit testing of helper functions: 10%
- Design/coding style of assembly functions, code walkthrough: 5%
Getting started
In a terminal, change directory to your local clone of your CSF project repository.
Download the starter code:
curl -O https://jhucsf.github.io/fall2026/assign/csf_assign02.zip
Unzip the zipfile, and add, commit, and push the starter code to your CSF project repository:
unzip csf_assign02.zip
git add csf_assign02
git commit -m'add assignment 2 starter code to project repo'
git push
Now you can delete the starter code zipfile:
rm csf_assign02.zip
Change directory into the csf_assign02 subdirectory within your CSF
project repository:
cd csf_assign02
You will implement the functions in c_imgproc_fns.c (Milestone 1)
and asm_imgproc_fns.S (Milestones 2 and 3.) You will also add
prototypes for helper functions to imgproc.h and implement additional
unit tests in imgproc_tests.c.
Image processing
This section describes the image format and the image transformations you will implement.
struct Image
An instance of the struct Image data type represents a grid of
pixels, where each pixel has 8-bit red, green, and blue color
component values, as well as an 8-bit alpha value.
The struct Image type is defined as follows (in image.h):
struct Image {
  int32_t width;
  int32_t height;
  uint32_t *data;
};
The width and height fields define the width and height of an image,
in pixels. The data field is a pointer to a dynamically-allocated array
of uint32_t values, each one representing one pixel. The pixels are stored
in row-major order, starting with the top row of pixels.
A color is represented by a uint32_t value as follows:
- Bits 24-31 are the 8 bit red component value, ranging from 0–255
- Bits 16-23 are the 8 bit green component value, ranging from 0–255
- Bits 8–15 are the 8 bit blue component value, ranging from 0–255
- Bits 0–7 are the 8 bit alpha value, ranging from 0–255
This pixel data format is known as “RGBA”.
The alpha value of a color represents its opacity, with 255 meaning “fully opaque” and 0 meaning “fully transparent”.
Image transformation functions
You will implement the following image transformation functions in both C and assembly language:
void imgproc_wrap( struct Image *in, struct Image *out,
                   int32_t dist );
void imgproc_blocky( struct Image *in, struct Image *out,
                     int32_t blocksize );
void imgproc_puzzle( struct Image *in, struct Image *out,
                     const char *positions );
void imgproc_rainbow_h( struct Image *in, struct Image *out );
These functions are declared in imgproc.h, and each one has a brief API
comment summarizing its function, the meaning of the parameters, and the
meaning of the return value (for the non-void functions.)
The full description of the behavior of each function is
in the following sections.
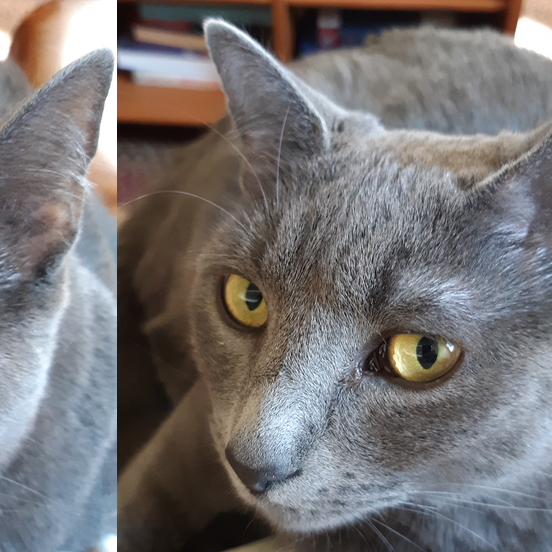
The wrap transformation
The wrap transformation takes the pixels in the original image and
moves them horizontally by a specified integer distance. For example, a
distance of 10 would mean that each pixel in the original image would move
10 pixels to the right. Pixels that move past the edge of the
image wrap around back to the other edge. For example, if the wrap distance
is 10, and the width of the image is 800, the pixels in the rightmost
column of the original image (column 799) would be copied to column 9
of the output image.
Note that the wrap distance could be negative. A wrap distance of -1 would mean that every pixel moves one position to the left, and the pixels in the leftmost column (column 0) of the original image would move to the rightmost column of the output image.
Also note that the transformation is expected to handle arbitrary distances, even if their absolute value is greater than or equal to the width of the image. For example, if an image is 800 pixels wide, a wrap distance of 800 should be treated as 0, a wrap distance of 801 should be treated as 1, and so forth.
Example:
| Original image | Transformed image (wrap distance=117) |
|---|---|
 |
 |
The blocky transformation
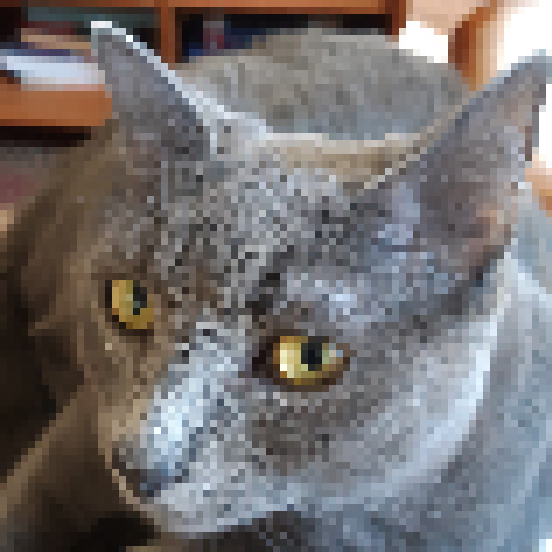
In the blocky transformation, each pixel in the output image is copied
from a specific pixel of the input image, based on a block size parameter
that is guaranteed to be positive.
Let’s say the block size is \(n\), the output pixel column is \(j\), the output pixel row is \(i\), the image width is \(w\), and the image height is \(h\). The output pixel should be copied from the input pixel whose column is \(\lfloor j / n \rfloor \times n\) and whose row is \(\lfloor i / n \rfloor \times n\).
Copied pixels should be copied exactly, including the alpha value.
Example:
| Original image | Transformed image (block size=7) |
|---|---|
|
 |
The puzzle transformation
The puzzle transformation divides the image into 16 equal-sized
tiles. (This transformation can only be applied to images where
both the width and height of the image are exact multiples of 4.)
The positions argument is a string value containing
16 characters. Each character is either a hex digit ('0'–'9'
or 'a'–'f'), or an underscore ('_'). The hex digits map onto
tile positions in the input image as follows:
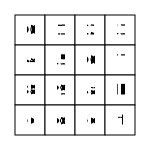
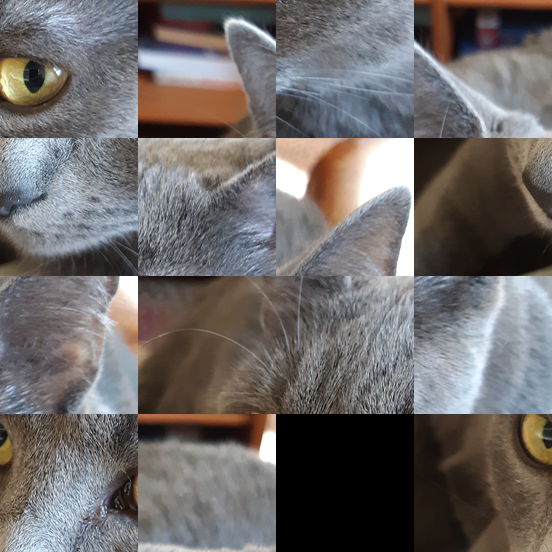
The positions string indicates, for each tile in the output image,
which input tile it is copied from. For example, if the tile string
is “a0e1d63c745b92_8”, that means that the output image
should be arranged as
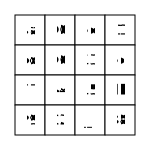
Note that the underscore character (“_”) indicates a tile that is
empty, and all of its pixels should be left as opaque black.
| Original image | Transformed image (positions=” a0e1d63c745b92_8”) |
|---|---|
|
 |
The rainbow_h transformation
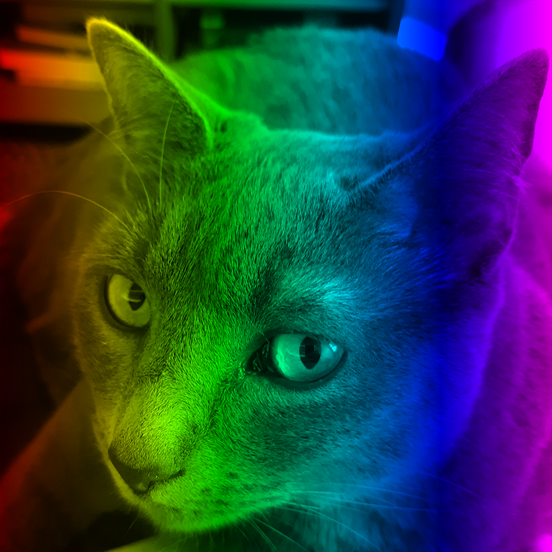
For each pixel in the input image, the rainbow_h transformation
- computes a full-intensity rainbow gradient color based on the pixel’s horizontal position in the image
- computes the pixel intensity of the source pixel, based on its RGB value
- computes an output pixel color by applying the source’s pixel’s intensity to the full-intensity rainbow gradient color
The source pixel’s column number (in the range \(0..w-1\), where \(w\) is the image width) should be mapped onto the range \(0..999{,}999\). This normalized column number should be computed as
\[\left\lfloor \frac{j \times 999{,}999}{w - 1} \right\rfloor\]where \(j\) is the input pixel column and \(w\) is the image width.
Next, the full-intensity RGB values of the rainbow gradient color should be computed. There are 5 “zones” in the gradient, which work as follows:
| Zone | Normalized columns (inclusive) |
RGB values |
|---|---|---|
| 0 | \(0..199{,}999\) | r=\(65{,}535\), g=ramp up, b=\(0\) |
| 1 | \(200{,}000..399{,}999\) | r=ramp down, g=\(65{,}535\), b=\(0\) |
| 2 | \(400{,}000..599{,}999\) | r=\(0\), g=\(65{,}535\), b=ramp up |
| 3 | \(600{,}000..799{,}999\) | r=\(0\), g=ramp down, b=\(65{,}535\) |
| 4 | \(800{,}000..999{,}999\) | r=ramp up, g=\(0\), b=\(65{,}535\) |
Note that the computed RGB values are in the range \(0..65{,}535\) rather than the usual \(0..255\), to allow for additional precision when applying the intensity to the rainbow RGB color.
“Ramp up” and “ramp down” mean that a color component value is either ramping up from \(0\) to \(65{,}535\) or ramping down from \(65{,}535\) to \(0\). Let’s say that the normalized pixel column is \(x\) distance from the beginning of the range. (E.g., in zone 1, the normalized pixel column \(200{,}010\) would be at distance \(10\) from the beginning of the range.) The effective color component when ramping up would be
\[\left\lfloor \frac{65{,}535 \times x}{199{,}999} \right\rfloor\]The effective color component when ramping down is found by substituting \(199{,}999 - x\) for \(x\) in the ramping up calculation.
Once the full-intensity RGB values are computed (each will be in the range \(0..65{,}535\)), the next step is to compute the intensity of the input pixel. Assuming that \(r\), \(g\), and \(b\) are the red, green, and blue color component values of the input pixel (each in the range \(0.255\)), the intensity \(t\) should be computed as
\[t = 79 \times r + 128 \times g + 49 \times b\]This will yield an intensity value in the range \(0..65{,}280\). Intensity-adjusted rainbow RGB values should now be computed. If \(c\) is one of the full-intensity rainbow RGB values (in the range \(0..65{,}535\)), then the intensity-adjusted value should be
\[\left\lfloor \frac{c \times t}{65{,}280} \right\rfloor\]Finally, from each intensity-adjusted RGB value \(c\), an output RGB value can be computed as \(\lfloor c/256 \rfloor\). The final output RGB values should then be combined with the unmodified alpha value of the input pixel to yield the output pixel’s RGBA values.
Example:
| Original image | Transformed image |
|---|---|
|
 |
c_imgproc and asm_imgproc programs
The c_imgproc and asm_imgproc programs apply one of the image transformations
to an input image (or, in the case of the composite transformation, two input images),
and write the result to an output image file. The c_imgproc_main.c source file
implements both of these programs. The only difference between c_imgproc and
asm_imgproc is whether the image transformations are implemented in C
(c_imgproc_fns.c) or x86-64 assembly language (asm_imgproc_fns.S.)
To run these programs:
./c_imgproc transformation input.png output.png [args...]
./asm_imgproc transformation input.png output.png [args...]
In these commands:
transformationis the name of the image transformation to performinput.pngis the name of the input image fileoutput.pngis the name of the output image file to write[args...]represents additional arguments needed by the transformation; for example, thewraptransformation needs one integer argument to specify the wrap distance
For example, to run the wrap transformation with a wrap distance of
117 using the c_imgproc program:
mkdir -p actual
./c_imgproc wrap input/ingo.png actual/ingo_wrap_117.png 117
The commands in this example would apply the wrap transformation
with a wrap distance of 117 to the input image input/ingo.png to
product the output image file actual/ingo_wrap_117.png.
Unit tests, helper functions
The source file imgproc_tests.c is a unit test program that you should use to
test the functions in c_imgproc_fns.c and asm_imgproc_fns.S.
The starter code has some very basic tests for the API functions implementing the various image transformations. However, you will need to write unit tests for your helper functions. The idea is that your assembly language code will implement exactly the same helper functions as your C code, and having a comprehensive set of unit tests for these helper functions will allow you to get your assembly code working incrementally by implementing the helper functions one at a time.
Having a good set of unit tests for your helper functions is essential for being able to make steady progress towards getting your assembly code to work in Milestones 2 and 3.
You are free to implement whatever helper functions make sense. Some of the helper functions defined in the reference implementation are:
int32_t get_sample_index( int32_t index, int32_t blocksize );
int32_t compute_index( struct Image *img, int32_t row, int32_t col );
void get_rgba( uint32_t pixel, uint32_t *r, uint32_t *g, uint32_t *b, uint32_t *a );
uint32_t make_pixel( uint32_t r, uint32_t g, uint32_t b, uint32_t a );
uint16_t ramp_up( int64_t x );
uint16_t ramp_down( int64_t x );
void compute_rainbow_rgb( int64_t x, uint16_t *r, uint16_t *g, uint16_t *b );
uint32_t compute_intensity( uint32_t r, uint32_t g, uint32_t b );
int32_t adjust_wrap_dist( int32_t img_width, int32_t dist );
int32_t hexdigit_to_int( char c );
void copy_tile( struct Image *in, struct Image *out, int32_t in_pos, int32_t out_pos );
Image tests
The provided script run_all.sh runs your c_imgproc or asm_imgproc program
on some example input images and checks whether a correct output image
is produced. To run it:
# test the C implementations of the image transformations
./run_all.sh c
# test the assembly implementations of the image transformations
./run_all.sh asm
Hints and tips
x86-64 tips
Here are some x86-64 assembly language tips and tricks in no particular order.
Callee-saved registers are your best option to serve as local variables
in your assembly language functions. The callee-saved registers are
%r12, %r13, %r14, %r15, %rbx, and %rbp. If you are going
to store data in a callee-saved register, make sure that you use pushq
to save its value at the beginning of the function, and popq to restore
its value at the end of the function. (The popq instructions must be in
the opposite order as the pushq instructions.)
If you run out of callee-saved registers, then you can use memory in the
stack frame to store local variables. We highly recommend using an ABI-compliant
stack frame to reserve memory for local variables, since that will allow
gdb to properly recognize the functions on the call stack. To do so,
your function’s prologue code should look like this:
pushq %rbp
movq %rsp, %rbp
subq $N, %rsp
...push callee-saved registers...
This prologue will reserve N bytes of memory in the stack frame that
you can use for local variables. Note that all local variables in memory
should be accessed at negative offsets from %rbp. For example, if you
reserved 16 bytes for local variables, and you need space for four 4-byte
variables, you can refer to them as -4(%rbp), -8(%rbp), -12(%rbp),
and -16(%rbp).
Don’t forget that the amount by which the stack pointer is
changed needs to be an odd multiple of 8 (so 8, or 24, or 40, etc.),
and that each pushq subtracts 8 from %rsp.
Also, don’t forget to pop back the original values of any saved
callee-saved registers, including %rbp. In general, your function
epilogue code should look like
...pop callee-saved registers...
addq $N, %rsp
popq %rbp
Don’t forget that you need to prefix constant values with $. For example,
if you want to set register %r10 to 16, the instruction is
movq $16, %r10
and not
movq 16, %r10
When calling a function, the stack pointer (%rsp) must contain an address
which is a multiple of 16. However, because the callq instruction
pushes an 8 byte return address on the stack, on entry to a function,
the stack pointer will be “off” by 8 bytes. You can subtract 8 from
%rsp when a function begins and add 8 bytes to %rsp before returning
to compensate. Pushing an odd number of callee-saved registers also works,
and has the benefit that you can then use the callee-saved registers freely
in your function. Sometimes you may need to subtract 8 from %rsp even
if your function doesn’t allocate storate for any local variables in memory,
just to ensure that %rsp is aligned correctly.
We strongly recommend that you have a comment in each function explaining
how it uses callee-saved registers and (if relevant) stack memory, since these are
the equivalent of local variables in assembly code. For example,
here is a comment taken from the implementation of the copy_tile
function in the reference solution:
/*
 * Register use:
 *   %r12 - pointer to input Image
 *   %r13 - pointer to output Image
 *   %r14d - pixel row in tile (i)
 *   %r15d - pixel column in tile (j)
 *
 * Memory (32 bytes available, 28 bytes used):
 *   -4(%rbp) - tile height (tile_h)
 *   -8(%rbp) - tile width (tile_w)
 *   -12(%rbp) - source tile row (src_tr)
 *   -16(%rbp) - source tile column (src_tc)
 *   -20(%rbp) - dest tile row (dest_tr)
 *   -24(%rbp) - dest tile column (dest_tc)
 *   -28(%rbp) - source pixel (src_px)
 */
Recall that your assembly language code must have detailed comments explaining each line of assembly code. The following example function illustrates the level of commenting that we expect to see:
/*
 * Determine the length of specified character string.
 *
 * Parameters:
 *   %rdi - pointer to a NUL-terminated character string
 *
 * Returns:
 *    number of characters in the string
 */
	.globl str_len
str_len:
	/* prologue to create ABI-compliant stack frame */
	pushq %rbp
	movq %rsp, %rbp

.Lstr_len_loop:
	cmpb $0, (%rdi)               /* found NUL terminator? */
	jz .Lstr_len_done             /* if so, done */
	inc %r10                      /* increment count */
	inc %rdi                      /* advance to next character */
	jmp .Lstr_len_loop            /* continue loop */

.Lstr_len_done:
	movq %r10, %rax               /* return count */

	/* epilogue */
	popq %rbp

	ret
As illustrated in the example function, labels for control flow
should be local labels, with names beginning with “.L”.
If you don’t use local labels within functions, debugging with
gdb will be difficult because gdb will think that each control
flow label is the beginning of a function.
Debugging tips
You primary means of determining whether or not your code works correctly
is running the unit test programs (c_imgproc_tests and asm_imgproc_tests.)
If a unit test fails, you should use gdb to debug the code to determine
why it is not working.
Setting a breakpoint on the specific test function that is failing is
one way to start. For example, if the test_make_pixel test function
is failing, in gdb set a breakpoint on the test_make_pixel function, then run the
program so that it only runs that test function:
break test_make_pixel
run test_make_pixel
You will gain control of the program at the beginning of the test function, at which point you can step through the code, inspect variables, registers, and memory, etc.
Another good option for setting a breakpoint is the tctest_fail
function, because this is the function called when a test assertion
fails. For example, assuming test_make_pixel has an assertion failure:
break tctest_fail
run test_make_pixel
When the tctest_fail breakpoint is reached, use the up command (as many
times as needed) to enter the stack frame for the failing assertion.
This can allow you to check variables at the location of the assertion.
Don’t forget that you can inspect register values in gdb by prefixing the
register name with the “$” character. For example:
print $ebx
would show you the contents of the %ebx register. Using print/x allows
you to see integer values in hexadecimal (very useful for checking color values.)
Casting a register to a pointer allows you to interpret memory as values
belonging to C data types. For example, let’s say %r10 points to a
struct Image instance. You could check the value of the element
at index 18 of the data array using the command
print/x ((struct Image *)$r10)->data[18]
If you are storing local variables in stack memory, and using %rsp to
access them, it is easy to see their values. In particular, if all of the
local variables are the same size and type (e.g., they are all
4-byte integers), then you can think of them as an array.
For example, in the comment above about local variable allocation,
there are 7 local variables allocated in stack memory, six of which
are 4 byte integer values, and one of which is an 8 byte integer value.
We can see the six four-byte values at once with the gdb comamnd
print (unsigned [6]) *((unsigned *)($rbp - 24))
Here we are pretending that these variables belong to the unsigned type,
which is the same as the uint32_t type. The (unsigned [6]) at the
beginning of the expression tells gdb that we are interpreting the
memory as an array of 6 unsigned elements. We use the expression
$rbp - 24 to compute the address of the beginning of the
area containing the 4-byte variables,
because it is 24 bytes in size, and %rbp points to the “top”
of the area. Note that the print command will show the values of the local
variables starting with the local variable with the “lowest” address, i.e.,
the one referred to as -24(%rbp).
We can see the 8 byte value in memory (at offset -32 from %rbp)
using the gdb command
print (unsigned long) *((unsigned long)($rbp - 32))
Template assembly language function
Here is a possible starting template for your assembly language functions. It has the following properties:
- 5 callee-saved registers (
%r12-%r15,%rbx) are available for general use - An ABI-compliant stack frame is created, using the
%rbpregister to refer to stack memory - The stack pointer will be aligned correctly as long as
N(the number of bytes of stack memory to reserve) is an odd multiple of 8 (i.e., 8, 24, 40, etc.) - You can use negative offsets from
%rbpfor variables allocated in memory (if you run out of callee-saved registers, or if you need to allocate a struct or array instance)
Feel free to use this as a starting point for your assembly functions.
/*
 * Template assembly function
 */
	.globl my_func
my_func:
	/*
	 * Register use:
	 *   TODO: describe how callee-saved registers are used
	 *
	 * Memory use:
	 *   TODO: describe how memory in the stack frame is used
	 */

	pushq %rbp
	movq %rsp, %rbp
	subq $N, %rsp
	pushq %r12
	pushq %r13
	pushq %r14
	pushq %r15
	pushq %rbx

	/* TODO: your code goes here */

	popq %rbx
	popq %r15
	popq %r14
	popq %r13
	popq %r12
	addq $N, %rsp
	popq %rbp
	ret
Submitting
Before you upload your submission, make sure that your README.txt
contains the name of each team member and a brief summary of each team member’s
contributions to the submission. If there is anything you would like us to
know about your submission, you can also add it to README.txt.
To prepare a zipfile for submission, run the command
make solution.zip
Please do not submit object files, executables, PNG image files,
or other files not mentioned above. (If you use make solution.zip
as recommended above, only the necessary files will be included in
the zipfile.)
Upload the zipfile to Gradescope as Assignment 2 MS1, Assignment 2 MS2, or Assignment 2 MS3, depending on which milestone you are submitting.